Thursday, 2 August 2012

Pizza recipe for children and bread with jam

It has been busy, carbohydrate-heavy day today, inspired by having an additional male child in our midst. Whenever my son brings his friends over there is always a lot of running around, tree climbing and toy gun warfare and today was no exception. With Cousin T to feed as well as the others, I decided to make large quantities of bread dough; some for lunchtime pizzas and some for a rustic loaf to accompany the apricot jam.

Fortunately only one of my brood dislikes olives, so he has to pick them off. The others love them. We keep a gigantic catering jar of black Crespo olives in the refrigerator at all times; very useful for making all food a bit more Mediterranean.

When money is tight and you have many mouths to feed, homemade pizza can be very economical, particularly if you can find a cheap source of strong white bread flour. The baker in the next village from us sells a variety of bread flours for fifty pence per pound. Wholemeal, spelt and more specialist flours I prefer to buy from the Letheringsett Watermill, but this basic white bread flour is perfect for pizza and large batches of bread rolls.

For the pizza base you will need:

2lb Strong white bread flour
1 Level tablespoon of fine sea salt
2x 7g Sachets dried bread yeast
1 Tablespoon sugar
4 Tablespoons olive oil
650ml Lukewarm water

For simple, child-friendly toppings you can include:

Ham, salami, 1 tin sweetcorn, 1 red pepper, 3 tomatoes, 1 thinly sliced courgettes, 1 tin tuna, olives and finely chopped onion.

You will also need a large block of supermarket value medium Cheddar (Mozzarella and/or Gorgonzola if making for grown-ups) and a tube of tomato puree and some mixed Italian herbs.

To make the dough, place the salt and flour in a large mixing bowl. In a separate jug mix the warm water, sugar, oil and yeast. Pour the liquid into the flour and mix well with a wooden spoon. Once it's all incorporated, tip it onto a floured surface and knead well for 5-10 minutes. (If you have a bread maker, you can get it to make the dough for you. Personally I think making the dough by hand is the most therapeutic part of bread making!) The dough should be smooth and springy.
Clean out your mixing bowl, oil it slightly and place the dough inside. Cover with a damp tea towel or some oiled clingfilm for at least one hour or until it has nearly doubled in size.
Turn the oven to approx 200C and flour some baking trays
Take the dough out of the bowl and knock it back down.
From now on you are a human pizza factory.
Pull a fist-sized lump off the dough and put the rest back in the bowl under cover. Roll out the dough until it is a thin, rustic shape and place it on your floured tray. Spread on a thin layer of tomato puree and then place any combination of your toppings on the pizza, followed by a scattering of Italian herbs and a generous grating of cheese.
Place in a hot oven for about 10 minutes and then start your next pizza. You will have to keep a close eye on what's in the oven and not get too carried away designing toppings because pizzas can cook very quickly. Finished pizzas can be taken out to rest. I usually find that the children have appeared by then and are helping themselves to the first batch. In total, I made five pizzas which served four children with two spare grown-up pizzas for supper later (and breakfast the next day). There was also enough dough to make the cheese and onion rolls pictured below.


I served this with a cucumber and and vinaigrette salad.
The children went round for second helpings and then outside to fly their remote controlled aeroplane. Pizzas gave them the energy they needed for liberating the plane from the many trees it became stuck in over the course of the afternoon. Whilst I wouldn't serve this at a dinner party, the total cost of feeding the children was around £1.50 per head if you discount my hoard of olives! It doesn't pretend any Italian authenticity, it's just cheap, scrummy food for hungry, active children.
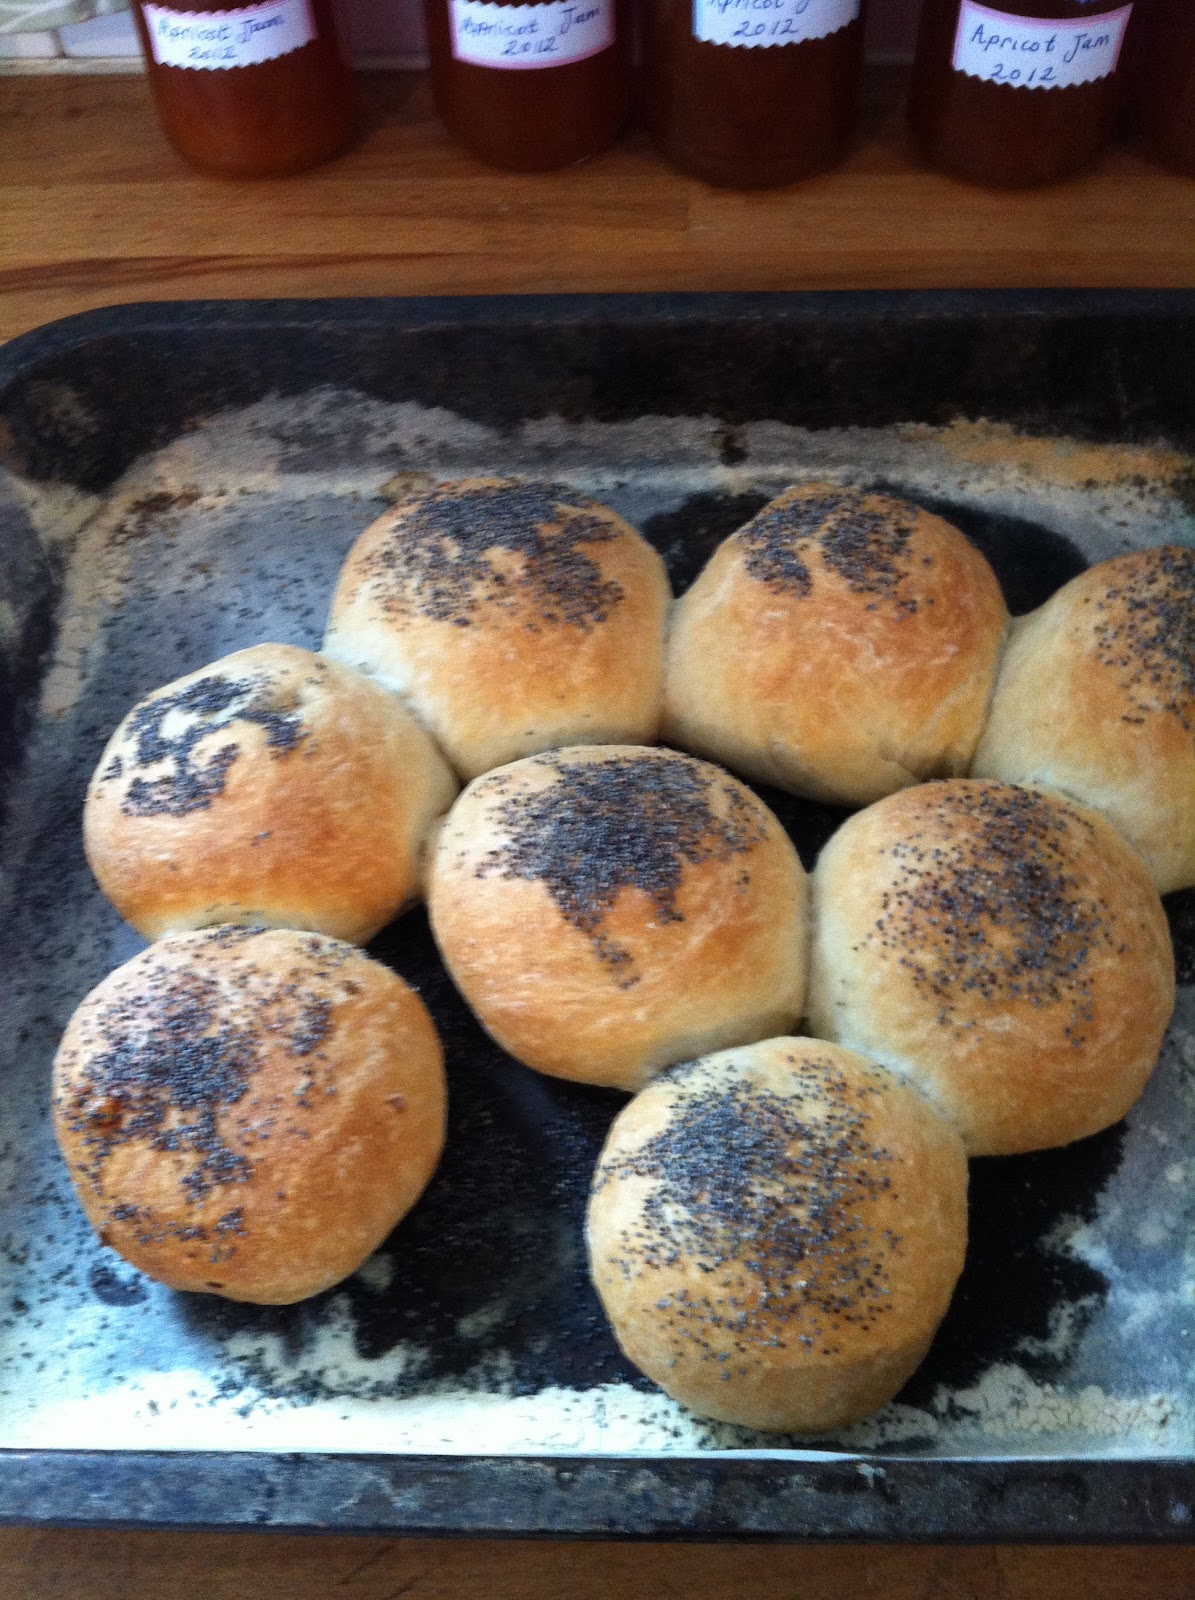

Cheese and onion stuffed rolls topped with poppy seeds

I had enough dough and grated cheese spare from the pizzas to make eight cheese-stuffed bread rolls. These are dreadful for the waistline but my husband is rather partial to these after several hours in the garden or as a 'soak' to a pint of real ale. You don't need a filling for them, however if feeling indulgent, a spoonful of homemade chutney makes a good match.

You will need:

One quantity of bread dough (see above)
Grated cheese (any type)
Chopped onions soften in a little olive oil
Floured baking sheet

Once the dough has risen and been knocked back, pull off a golf ball-sized lump. Flatten it in the palm of your hand and shove in some of the cheese and some of the onion. See below left.


Gradually mould together the disc of dough around the cheese and onion. (See above right)
Bring together the edges of the disc around the filling and nip together to form a seal (below).

Place on a floured baking tray with the sealed side down leaving one centimetre between each roll. Brush with water, scatter with poppy seeds and allow to rise again for 30 minutes.

A productive morning. Recipe for the rustic country loaf below.
The rustic loaf of bread above is very simple to make. The main thing is to remember is to start it the day before by mixing up a handful of stoneground flour with 7g dried yeast, 1 tablespoon sugar and enough warm water to make a thin paste. After 24 hours under cover it should be bubbly and smell a bit like beer.

In a separate mixing bowl add 1 lb strong white bread flour and 1 tablespoon fine sea salt. In a large jug add 325 ml warm water and the starter dough you made the day before. Whisk it into a sloppy mix and add it to the flour and salt. Stir well with a wooden spoon until you can turn it out onto a floured surface for kneading. Knead for 10 minutes until smooth, springy and pliable. Put into a lightly oiled bowl and cover with a damp cloth for up to 2 hours or until doubled in size.
Once risen, knock back the dough and form into a roundish, smooth lump. (At this point, if you want a very savoury bread, you can knead in some herbs.) Slash the top with a bread knife in a pretty pattern, dust with flour and leave to rise for another hour. See below:
Once the bread has risen to a good size, place in a hot oven (200C) for 30-40 mins. The bread should have browned and if turned over and tapped, the base should sound hollow.


Very pleased with this loaf. It is bigger in life than it looks on the photo and is full of airy holes. It slices really well and is perfect with salted butter and the apricot jam. The jam recipe is soon to be found on the 'Vintage recipe books' post.


Monday, 30 July 2012

Old recipe books

I am a passionate collector of recipe books, both old and new, but I have to say, the old ones are by far my favourites. Over the next few weeks I will be reviewing some of these almanacs of practical and economic cookery advice and trying out a few recipes. Whilst I'm not about to start serving up 'Pig's Trotter in Aspic', I do intend to recreate some of these century-old dishes for our delectation and evaluate the results.
The first volume that has been put to practical use is the inspirationally-named 'Foulsham's Universal Cookery Book' and promises "The best value cookery guide and 1000 tested and inexpensive recipes." Published by W. Foulsham and Co. Ltd, Fleet Street, London. circa 1940, this was kindly given to us for Christmas by our discerning friends, Barbara Jane and Des Miller.

Whilst the front cover may look a little 'utilitarian', I can only imagine that the driving thought behind this gift was that the book is actually covered in old brown paper and stuffed full of newspaper cuttings and hand-written recipes; far more interesting to look at and aesthetically pleasing. See below.

The makeshift brown paper cover, both front and back, are full of neatly folded recipes collected from newspapers that date from as far back as 1939.


This beautifully hand written recipe for Eclairs was slotted between the pages
 Whilst I do have an eccentric obsession with these artifacts of culinary history, I am equally interested in the variety of dishes and meals that wait to be brought to life again in someone's kitchen. With guests invited for lunch today, I was contemplating baking some traditional farmhouse cakes; the sort my Grandmother used to make when I was a child. The one cake that came to mind was the mini Bakewell tart. The type that has a pastry base, a layer of raspberry jam, topped with a moist almond sponge and sprinkled with flaked almonds. I am sure everyone has come across these before.
Mentioning no names, I pulled down a pile of my favourite modern cookbooks written by much-loved and acclaimed cookery writers, television presenters and chefs. Not one recipe for individual Bakewell tarts. Even East Anglia's own Delia omitted this farmhouse favourite from her classic tomes.
My next logical, yet slightly delayed thought was 'we're talking granny's baking here, so we need a book that granny would have used.' Confidently sliding this understated paperback from my pantry shelf and turning to the chapter entitled 'Biscuits, buns, cakes, tarts and teacakes', there it was; "Macaroon Tartlets." Not quite the title I was expecting, but it fitted the description perfectly.
Macaroon Tartlets-AKA Mini Bakewell tarts
I love the sparseness of information given in the instructions. Nowadays, less experienced cooks would require the recipe for shortcrust pastry and more precise guidance as to the finish, texture and colour of each stage. Experience and a greedy reminiscence of this moist, jammy delight, guided me quickly through every basic step. Once my speedy, butter shortcrust pastry had rested in the refrigerator, I brought out the recently made raspberry jam, mixed up my almond and egg paste and began to assemble these little beauties. Fussy recollections caused me to alter the topping from thin pastry strips to a scattering of flaked almonds to fit in with my expectations.

Under construction

The finished product, brought to life from a wartime culinary manual

Mini Bakewell Tarts, or 'Macaroon Tartlets' sit side by side with some quick mini pavlovas on my china cabinet. In the background and on the right, Granny and Grandad Thacker are pictured on their wedding day and on the left, Great Grandma Woodland, her mother, survey the dining room as I wait for my guests to arrived. I hope I have made them proud.
In the next few days, I will be reviewing another of our vintage recipe books. I may even try making something a little more daring and unusual!

Sunday, 29 July 2012

Pantry pleasures


My new collection of mismatched vintage tins to hide away all those silly packets.

Favourite tin-Sir Winston, who harbours the rice.

We are lucky enough to have an old fashioned pantry with a cold slate, plenty of shelving and room for all those things you want out of your kitchen. In my view and if possible, a kitchen should be for preparation, cooking and have a large wooden table for the family to sit around, eat and converse.
The pantry is one of my favourite places in the house; it is the lifeblood of the home and a reflection of all the work my husband and I do to feed our family.
A traditional pantry should be kept spotlessly clean and scrubbed on a regular basis. It is, after all, an area where food is stored and sometimes prepared. Being north-facing and with its open, meshed window, it is the coldest place in the house throughout the year. In the winter the icy winds blow across the field, occasionally bringing sleet and snow through the shaded opening. The door is always kept closed and bolted, so in the summer flies cannot make their way in. Hot feet can be cooled on the quarry tile floor and milk will store for several days on the cold, slate worktop.
Our vintage mincer is used regularly to make homemade sausages, patties and meatloaf.
Many a wasted hour is spent perusing recipe books of old and new.


The baskets provide attractive, yet practical, storage for fruit and vegetables.

Up until our wedding last year, we lived without a refrigerator for five years. The pantry is cold enough to store almost everything. Cheese was kept in an antique cheese dish on the slate with the milk. Meat was kept frozen in the deep freezer in the barn until needed for cooking. Leftovers could be kept happily for several days under the window while the hungry hoards systematically helped themselves to the likes of cold rabbit pie and lasagne. Our good friends Howard and Dee presented us with a fridge last summer in anticipation of chilling many bottles of champagne for our wedding. I must admit since then, the joy of chilled white wine has made owning a small larder fridge very worthwhile! Once again though, we have enough room in the pantry for this so that it doesn't cause an eyesore in the kitchen.

Jars of dried beans and pulses are stored alongside crockery and plates.

This summer's jam efforts as well as our homemade pickles (including Old Dowerhouse chutney of a 2009 vintage). Essential items such as preserving pans and food mixers have a home in this space without being cursed for taking up room in a small kitchen cupboard.
As I have mentioned before, I am a dreadful procrastinator. It only takes a trip into the pantry, a leisurely survey of the shelves and a peek into the pages of a favourite recipe book and before you know it, I am baking bread, preserving some fruit or creating an impromptu snack for the children.

Today's pantry-filling mission was to Back To The Garden, a farm shop and delicatessen in Letheringsett. We have French visitors tomorrow for lunch and I am determined to demonstrate good food and cooking from North Norfolk. Homemade bread is a priority and I needed to stock up on some different bread flours. Normally I will buy the flour straight from the watermill up the road in Letheringsett but it is closed on a Sunday. Knowing I could get the same flour from Back To The Garden, we used it as an excuse to purchase a few of Norfolk's finest local cheeses. Throwing in an enormous locally grown cucumber and some English vine tomatoes, we left feeling considerably lighter in the pocket but virtuous in our patronage of local food producers.


Cheeses include Norfolk Dapple, Binham Blue, Norfolk Mardler and Norfolk Charm-a ewe's milk cheese. Flour includes Letheringsett stone ground wholemeal flour, Letheringsett white self-raising flour and Dove Farm spelt wholemeal flour.
 The pantry is a magical and sacred place in our home. It is where the turkey hangs from the ceiling and where the Christmas cake fruit steeps in brandy in the winter; it is where muslin bags containing fruit drip into pans for jellies and cucumbers for pickling shed their water in layers of salt in the summer; it is where sourdough grows and infuses overnight and it is where jars of damsons and sloes soak in gin; among many other qualities, it is where recipes in ancient books of years gone by beg to be re-created and brought to life. I love my pantry. It is a pleasure and a passion.

Tuesday, 24 July 2012

Chicken Caesar Salad


In this hot weather we will be eating light meals from the garden

After a day of indulgent sunbathing under the forget-me-not Norfolk sky, we are hungry; but not that hungry. The obvious quick meal of the day is Caesar Salad. I absolutely love Cos lettuce; mainly because I have always loved Caesar salad (as well as that delicious chicken liver salad they used to serve at Cafe Rouge). The elongated, crispy leaves look so pleasing with a homemade dressing drizzled over. Now we always grow this variety; we also grow the Italian curly leaved cut-and-come-again as well as red chicory. When growing your own vegetables, the first rule is to grow what you love to cook and eat!
The name of the seed variety is 'Lobjoits Cos' which is easy to get hold of and has a good germination rate
For Chicken Caesar Salad you will need:

5 plump chicken thighs with skin on
Loaf of stale white bread ideally a ciabatta/French stick
3 sprigs fresh rosemary finely chopped
salt
pepper
olive oil
6 slices smoked bacon
2 large or 4 smaller homegrown cos lettuces
1 can anchovies in oil
150g pack of fresh Parmesan
1 garlic clove
Juice of 1 lemon
Heaped tablespoon of creme fraiche
Olive oil

Preheat oven to 200C
First put torn up bits of bread in a small baking tray with the chicken thighs.
Add seasoning, chopped rosemary and a drizzle of olive oil.
'Smoosh' around with your hands to ensure the bread and chicken has a good coating of oil and flavours. Then bring the chicken to the top, making sure the bread forms a layer under the chicken.
Put the tray in the oven for around 35-45 mins. (The bread should have toasted as well as soaked up the chicken and herb juice.)
Remove from the oven. Lay the bacon over the chicken and put back in the oven for another 20 minutes until the bacon is crispy.
While the bacon is crisping, make the dressing.
Put the can of anchovies in a pestle and mortar with the clove of garlic and mash to a pulp.
Scrape into a small bowl and beat in the lemon juice, creme fraiche, 75g grated Parmesan and about 4 tablespoons of olive oil.
Chill for 10 minutes while you deal with the meat.
Remove the tray from the oven when the bacon has crisped and the chicken meat is dropping off the bone. Allow it to rest for 5 minutes then pull the chicken meat off the bones, snip the bacon into shreds and remove the croutons of bread for cooling.
Wash the cos lettuce but don't chop it-leave it whole. Place it in a large mixing/salad bowl. Add the chicken, bacon slices and croutons. Then add the dressing to taste and toss it around with your hands to ensure a good coating. Finish with some shavings of fresh Parmesan.
The scrumptious aspects of this dish are the combination of clean crunchy lettuce with warm chicken and bacon, the sharp, salty, creamy dressing and the cheesiness of the Parmesan.
Serve with new potatoes. All you need is an ice cold glass of Sauvingon Blanc to cut through the creamy cheesiness.


Sunday, 22 July 2012

Strawberry and raspberry jam-and a bit of booze

Feeling industrious after our fruit-picking adventure, I set about sterilising jam jars and wine buckets to deal with the produce straight away. 
Luckily I have two large preserving pans, so I can make both strawberry and raspberry jam simultaneously.
Jam making is very simple. All you need is the fruit, sugar and a little lemon juice.
For all jams, the rule is you need the same weight of sugar as the weight in fruit. However, with strawberries, due to their wonderful sweetness, use less than this. I have started using jam sugar, which has added pectin (the thing you need to make jam set). Most fruit contains pectin and it will set anyway but you need to add more lemon or some apple. With jam sugar, even the lemon is not necessary and it saves a huge amount of faffing.

4lb Strawberries (without the stalks)
3lb Jam Sugar
Juice of 1 lemon

Some folks say you should leave the sugar on the fruit in the pan over night. I have discovered that this is okay if you are prepared to spread hard strawberries on your toast. I like my fruit soft in jam so I don't add the sugar until later.

Put the fruit and lemon juice into the preserving pan. Cook on a low to increasing heat until the strawberries become soft. Then add the sugar. Keep at a steady boil until 'setting point' is reached. Skim off the 'scum' into a separate saucer. (The scum is literally the bubbly, frothy bits of jam that rise to the top of the pan. It can't go in the jars in case the airy bits encourage mould. Spread the scum on homemade bread over the next few days. Yum!) You need a cold saucer to blob a bit of jam on. If it wrinkles when you try and move it around with your finger it is ready. Pour into jars. Only use jars with a rubbery ring around the lid. Coffee and peanut butter jars don't work because they don't seal properly.


For Raspberry Jam you need:
4lb raspberries
4lb jam sugar
juice of 1 lemon

Put the raspberries and lemon juice in a pan. Cook gently until soft. Add the sugar and boil rapidly until setting point is reached. Skim off the 'scum' into a bowl and jar.


It is really important that the jam reaches setting point. Experience at jam making helps, but essentially the jam needs a dark, glossy 'wobble' to it as well as the finger test. If the jam doesn't set, it will be hard to spread and the fruit won't be evenly dispersed in the jar.


I like my pantry to look pretty as well as functional so I nearly always put fabric on the lids. I collect all the elastic bands you get wrapped round asparagus and these hold the circles in place. Most of the material is offcuts from patchwork projects; some vintage pieces and some modern. I recommend buying old tea towels and curtains from charity shops for this sort of thing. I'm afraid I cheat and buy Cath Kidston labels but maybe over the summer, I will make my own.

Now for the wine:

We are very partial to summer fruit wine but it can be quite expensive to make if you have to buy the fruit. Still it is worth make a gallon or two because the pleasure of uncorking a little bit of summer in those dark winter months is unmatchable.

Squished strawberries, sugar and hot water.

Raspberry wine. The fruit is in a muslin bag to avoid a cloudy liquid.
For both raspberry and strawberry wine you have the delightful task of 'smooshing' up the fruit with your bare hands; in the sterilised bucket and ideally in a muslin bag, the fruit needs a good squish. Pour enough boiling water over the fruit to cover it, allowing 1 gallon per 3lb of fruit. It is a good idea to put the sugar  (3lb per gallon) in before the water, so it dissolves. Add a squeeze of lemon juice and, later on when the liquid has cooled to room temp, a heaped teaspoon of wine yeast.
After putting into demijohns and racking at least once, the wine will be ready in 3-4 months.


Fruit picking at Wiveton

The first day of the holiday began with the most perfect Norfolk sky; cloudy inland but vast, clear and cerulean blue by the coast. Bundling the children (child labour) into the car with assorted containers, I headed for the fruit farm with jam on my mind.
Wiveton Hall fruit farm and cafe is one of those idyllic places that makes you just wish you had thought up the idea or even had the means to create it. At the side of the road between Blakeney and Cley is a small sign and shed selling fresh strawberries, broad beans and agapanthus plants. This is just a teaser for what you will find when you drive down the track. The regulation PYO set-up is in place but within the setting of the grounds of a Jacobean Hall and kitchen garden. It is a family run business with local people employed to assist with the shop and the cafe. I say cafe, but it is an utterly gorgeous venue situated within the strawberry fields and gooseberry bushes selling tapas, homemade scones and salads created with produce from their own kitchen garden.

Wiveton Hall Cafe with its mismatched painted chairs and tables


DB loves fruit picking


A fruit farm situated at the brink of the Norfolk coast, where the marshes end and the sky begins.

As you may have guessed, I was completely distracted by the gorgeousness of the location.
So, back to business; strawberries. After giving each of my three children a container and tutoring them in efficient strawberry picking, we methodically set about the task. However, my eldest daughter was more interested in getting a sun tan, my son was busy eating his own body weight in fruit and my little DB declared "I lost my basket, mummy, so I will put them in my mouth instead." Needless to say, it took some time to get enough for jam and wine but crouching within the rows of straw and heavily laden strawberry plants was delightful. The warm, jammy smell of the juicy fruits teamed with the sound of wood pigeons and skylarks was heavenly.


Once we had enough strawberries, we turned out attention to raspberries. Raspberries are twice as expensive as strawberries, even if you pick your own, but we still needed the same amount as the strawberries; for jam and for wine.
Behind a large poly tunnel we found rows and rows of raspberry canes laden with the dark crimson fruits. Once again, it was a challenge not to simply gorge ourselves on them.


Three baskets later, the children were complaining of hunger and thirst so we headed to the cafe for lunch, apple juice and homemade ice creams.


This menu inspired me to go home and recreate dishes in my own kitchen, but at the time I opted for a Wiveton Salad. The glorious mix of colours, flavours and textures epitomised summer on a plate.


The Wiveton Salad

Today was a summer holiday snapshot at its finest. I will attempt to create another post on the transforming of today's fruit into edible, drinkable produce.